How to Get Rid of Razor Bumps Fast (Overnight to 1 Week)
If you're reading this, chances are you're dealing with the frustration of razor bumps right now. Those red, irritated bumps that appear after shaving aren't just unsightly—they're uncomfortable, sometimes painful, and can seriously impact your confidence.
The good news? You don't have to suffer through weeks of waiting for them to clear up on their own. With the right approach, you can see significant improvement overnight and achieve complete clearance within a week.
What Are Razor Bumps (And Why Do They Happen)?
Razor bumps, medically known as pseudofolliculitis barbae (PFB), occur when freshly cut hair curls back and grows into the skin. This triggers an inflammatory response, resulting in those characteristic red, raised bumps.
The Science Behind Razor Bumps
When you shave, you're cutting hair at an angle, creating a sharp tip. In people with:
- Curly or coarse hair (the hair naturally curves back toward the skin)
- Sensitive skin (more prone to inflammation)
- Improper shaving technique (shaving too close or against the grain)
...that sharp hair tip can pierce the skin surface as it grows, causing irritation and inflammation.
The 24-Hour Emergency Protocol
If you need relief fast, this protocol targets immediate symptom relief while preventing further irritation.
Step 1: Stop the Inflammation (First 2 Hours)
Cold Compress Application
- Wrap ice in a clean cloth
- Apply to affected area for 10 minutes
- Repeat every 2-3 hours
- Why it works: Reduces blood flow to the area, minimizing swelling and redness
Apply Hydrocortisone Cream (1%)
- Over-the-counter anti-inflammatory
- Apply thin layer to bumps
- Use 2-3 times in first 24 hours
- Why it works: Directly suppresses the inflammatory response
Step 2: Treat the Ingrown Hairs (Hours 2-8)
Salicylic Acid Treatment (2%)
- Gently exfoliates dead skin cells
- Helps trapped hairs break through the surface
- Apply after cold compress treatment
- Why it works: Chemical exfoliation is gentler than physical scrubbing
Witch Hazel Application
- Natural astringent with anti-inflammatory properties
- Apply with cotton pad
- Use between other treatments
- Why it works: Reduces inflammation and prevents bacterial infection
Step 3: Prevent Infection (Hours 8-24)
Benzoyl Peroxide Spot Treatment (2.5%)
- Apply to individual bumps before bed
- Kills bacteria that can cause infection
- Start with lower concentration to test sensitivity
- Why it works: Prevents pustule formation and secondary infection
Important: Don't use all products at once. Space treatments 2-3 hours apart to avoid over-irritating the skin.
The 7-Day Complete Clearance Plan
For comprehensive treatment and prevention of future breakouts, follow this week-long protocol.
Days 1-2: Immediate Relief Phase
Morning Routine:
- Gentle cleanser with lukewarm water
- Salicylic acid toner (2%)
- Hydrocortisone cream on active bumps
- Fragrance-free moisturizer
- Sunscreen (if bumps are on face/neck)
Evening Routine:
- Gentle cleanser
- Warm compress (5 minutes) to soften skin
- Glycolic acid treatment (5-8%)
- Benzoyl peroxide spot treatment
- Night moisturizer
Days 3-5: Active Treatment Phase
Add These Steps:
Retinol Treatment (0.25-0.5%)
- Apply every other evening
- Promotes cell turnover and prevents ingrown hairs
- May cause slight peeling (this is normal)
Daily Gentle Exfoliation
- Use chemical exfoliants, NOT physical scrubs
- AHAs (glycolic or lactic acid) work best
- Apply once daily, preferably evening
Resist All Temptation to:
- Pick or squeeze bumps (introduces bacteria)
- Shave the affected area (wait until mostly clear)
- Use harsh scrubs (worsens inflammation)
Days 6-7: Recovery and Prevention
Focus on Healing:
- Continue gentle cleansing routine
- Reduce active treatments to once daily
- Emphasize moisturization and barrier repair
- Consider introducing a niacinamide serum (reduces inflammation)
Product Recommendations That Actually Work
Based on extensive testing and dermatologist recommendations:
Best OTC Treatment Products
- Tend Skin Liquid - Contains salicylic acid and glycolic acid blend
- CeraVe SA Cream - Gentle exfoliation with ceramides for skin barrier
- PFB Vanish + Chromabright - Specifically formulated for razor bumps
- Differin Gel - Retinoid treatment (adapalene 0.1%)
Essential Support Products
- Cleanser: CeraVe Hydrating Facial Cleanser
- Moisturizer: La Roche-Posay Toleriane Double Repair
- Spot Treatment: Mario Badescu Drying Lotion
Note: These are honest recommendations based on effectiveness. Some links may be affiliate links, which support this site at no extra cost to you.
When to See a Dermatologist
While most razor bumps clear with at-home treatment, seek professional help if you experience:
- No improvement after 2 weeks of consistent treatment
- Signs of infection: Increasing pain, warmth, pus, fever
- Severe scarring or hyperpigmentation
- Cystic bumps that are deep, painful, and don't come to a head
- Widespread outbreak covering large areas
Dermatologists can prescribe:
- Prescription-strength retinoids
- Oral or topical antibiotics (if infected)
- Corticosteroid injections (for severe cases)
- Laser hair removal (permanent solution)
Preventing Future Razor Bumps
The best treatment is prevention. Once you've cleared your current outbreak:
Shaving Technique Improvements
- Shave in the direction of hair growth (not against)
- Use a single-blade razor or safety razor (reduces irritation)
- Never dry shave - always use shaving cream or gel
- Shave after shower when hair is softened
- Replace blades frequently (every 5-7 shaves)
Pre-Shave Protocol
- Exfoliate 24 hours before shaving
- Use warm water to open pores
- Apply quality shaving cream and let sit 2-3 minutes
- Use light pressure (let the razor's weight do the work)
Post-Shave Care
- Rinse with cold water to close pores
- Apply alcohol-free aftershave or witch hazel
- Moisturize immediately
- Avoid tight clothing over shaved areas
Consider Alternatives
If razor bumps persist despite perfect technique:
- Electric razors: Cut hair above skin level
- Depilatory creams: Dissolve hair without cutting
- Laser hair removal: Permanent reduction (most effective long-term solution)
- Waxing or sugaring: Removes hair from root (but can still cause ingrown hairs)
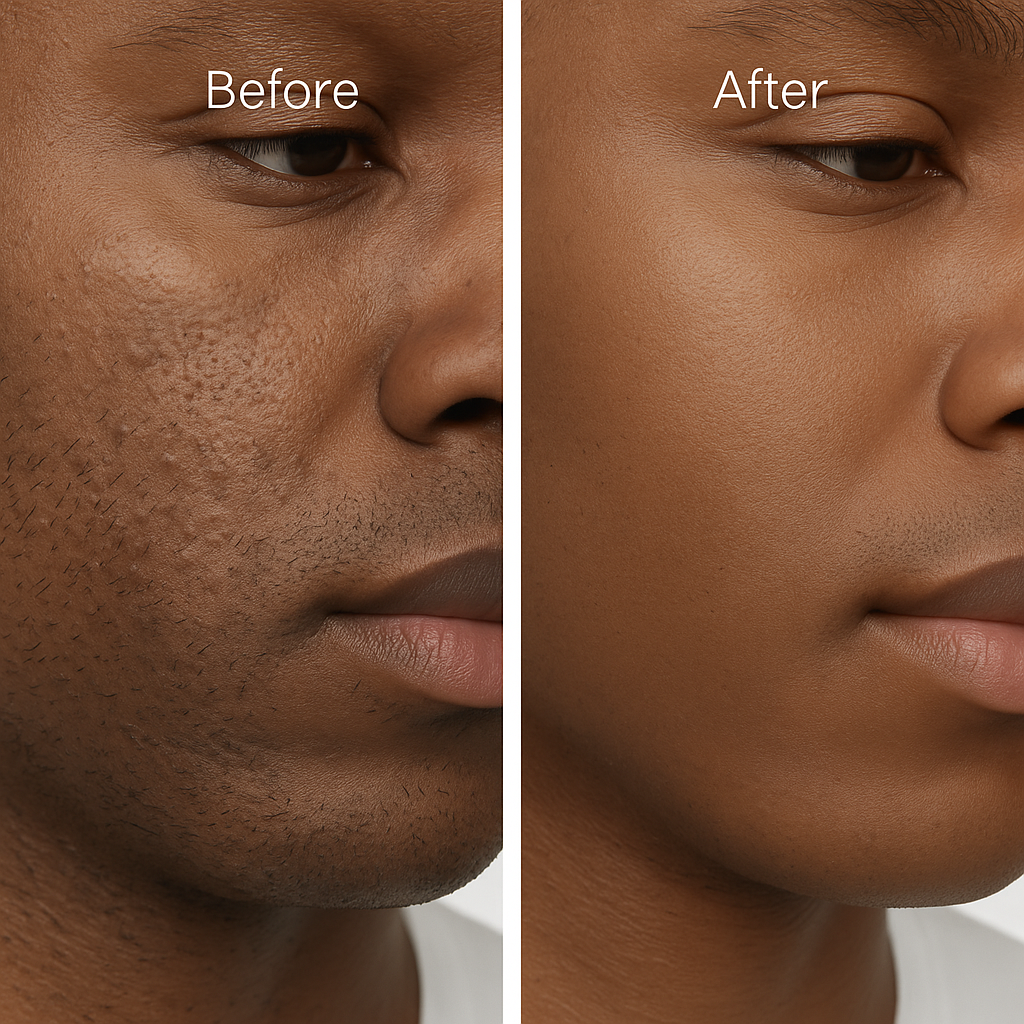
Real Results: What to Expect
Based on this treatment protocol, here's a realistic timeline:
- 12-24 hours: Visible reduction in redness and swelling
- 2-3 days: Inflammation significantly decreased, some bumps starting to flatten
- 5-7 days: Most bumps cleared, remaining ones minimal
- 2 weeks: Complete clearance, skin returning to normal texture
Important: Results vary based on severity, skin type, and consistency of treatment. Don't get discouraged if your timeline is slightly longer.
The Bottom Line
Razor bumps are frustrating, but they're treatable. The key is:
- Act quickly - Early intervention prevents worsening
- Be gentle - Aggressive treatments backfire
- Stay consistent - Skip days = delayed results
- Prevent recurrence - Improve shaving technique
Remember, the fastest way to clear razor bumps is to stop creating new ones while treating existing bumps. That means no shaving the affected area until it's mostly healed—usually 5-7 days.
Your skin will thank you for the patience.
Have questions about treating your specific razor bump situation? Check out our comprehensive prevention guide or browse our product reviews for tested recommendations.
Medical Disclaimer: This article is for informational purposes only and doesn't replace professional medical advice. If you have severe or persistent razor bumps, consult a dermatologist.